Tuesday, May 17, 2011

How to make cat ears from felt


 My daughter's kindergarten class had a day where they could dress up like a character from their favorite book.  My little one chose to be Pete the Cat, a cute story about a black cat who wears a pair of white tennis shoes. 

Materials needed:
  • Black felt (enough for two ears)
  • Two hair clips or a headband
  • Needle and thread
1.  First I folded the felt in half and cut out two slightly rounded triangles. 
When I opened them up, they were the shape below: 


2.  Next I folded the felt ear around the hair clip as shown.

 
 3.  Stitch the front of the felt to the back right above the barrette so it stays in place.  If using a headband, do the same around the headband, only make sure that the ears are in the right place.
 

 4.  Now, stitch all around the outside of the ear as shown.
 

5.  Make a second ear and that's it!


These were so fast to make and soooo cute on my little kitty cat.
I also made her a cat tail out of black felt with a wire inside it to keep it curled.

Thursday, May 5, 2011

Glove Bunny


My daughter and I made this little plush bunny one day when she was bored and we were trying to think of something to do.  The best part - we didn't have to buy anything to make it!

You will need:
  • a pair of gloves that you don't mind cutting up
  • fabric for making the clothes (optional)
  • buttons for eyes and nose
  • stuffing
  • needle and thread
  • scissors
(I didn't take pictures while we were making this, so I have made a paper glove below to help explain the steps.)

1)  For the bunny's head, cut off the glove's thumb, middle finger and pinkie as shown below.  Be sure   to leave a little bit of material so you can turn it in and sew.


2)  Next, turn that glove inside out and sew up the holes.
3)  Use buttons, beads or any other embellishments to make a face for your bunny.  You could probably use a fabric pen too.
4)  Turn the other glove into a body by cutting off the middle and ring fingers and the thumb.


5)  Use the middle and ring fingers to make arms.  Make a cut where the arms should go, turn the glove inside out, pin the arms in place and sew them on.  (be sure not to sew them closed, they still need to be stuffed!)


6)  Sew up the other openings in the glove and turn it right side out.
7)  Stuff the head and body with stuffing and sew them together.
You now have a cute little bunny toy!

Tuesday, May 3, 2011

Kalter Hund


A friend of mine sent this recipe to me from Germany and I had to try it.

This is a traditional child's birthday cake in Germany, but is more like a fudge since it is not baked or "cakey" like I would think of an "American" birthday cake.  It is very tasty!  Just Google "Kalter Hund" and you'll see some beautiful pictures and variations.  Mine seems a little short and not too many layers.

Kalter Hund

2/3 lb. coconut oil
1/6 lb. powdered sugar
2 oz. baking cocoa
3 eggs (whipped)
1 shot of rum
Flat butter cookies or graham crackers
colorful candies to decorate like M&M's
  1. Melt coconut oil. 
  2. Add sugar and cocoa and let it cool. 
  3. Add whipped eggs and rum. 
  4. Spread plastic wrap in a loaf pan. 
  5. Pour a thin layer of the chocolate in the pan and top with a layer of cookies.  Repeat the layers ending with chocolate. 
  6. Cool the cake in the refrigerator over night. 
  7. Turn it out on a large plate and decorate with colorful sweets.
  8. Slice it into thin slices to serve.

Friday, April 22, 2011

Easter Egg Dying

This year instead of buying the package of easter egg dye, we decided to use the ingredients already on hand!

We filled each cup with about 1 cup of water and added about a teaspoon of vinegar to each cup.

I hard boiled the eggs like this, First I put the eggs in a medium sauce pan, covered them with water, added a teaspoon of salt to the water and brought them to a boil. Once they were boiling, I put the lid on, and turned off the burner. I let them sit for 15 minutes, then put them back into the egg container and back into the refrigerator.

To add the food coloring, start with a few drops, then add more to reach your desired color. We would put an egg in the color let it sit for a couple minutes and then check it. Sometimes we would add a few drops more to make a stronger color.
We used a white crayon to draw designs on the eggs before dipping them.
And sometimes made the eggs double colors by holding them in one color, then flipping it over and holding it in a different color.
Here is the finished product! And it was all done from things I had at home.

A Pirate Hat Cake!!

I made this cake for my daughter and her friends that were in a pirate musical at their school. I found it in my Family Fun magazine, and just had to make it when I saw it! For the original recipe and directions click here.

I made two round cakes with this recipe. A box mix would be fine too, I just didn't have one on hand :)

Next, I used a pre made vanilla frosting to put between the two cakes.

Then I cut them like this.

Next I covered a rectangle skillet with foil, and set the cake pieces up like this,

Next comes the frosting! The edges were a little difficult to frost, so I added a little milk to the frosting and used a hand mixer to mix it up a bit. This process softened it up so that it was very easy to spread. (be very careful if you decide to add milk, just a tiny bit at a time till you get the desired consistency)

Here come the details... I used the Betty Crocker Decorating Cupcake Icing that comes in a can (sort of like easy cheese) I love this stuff because it comes with several different tips and is very simple to use.

Then to make the skull and cross bones I took a tooth pick and traced what I wanted onto the cake. I messed up a couple times and it was easy to smooth over and try again. Once I was happy with my picture, I very carefully traced it with the decorating icing. Last, I switched the tip on the icing can and added a little decoration around the entire bottom of the cake.

The kiddos loved it!


Wednesday, April 13, 2011

Felt Baby Shoes


My daughter's kindergarten teacher is leaving soon to have a baby girl and so I made these sweet little shoes as a gift.  
I just love this pattern for Heather Bailey's Bitty Booties.  You can print out her instructions and the pattern which is so easy (and addictive to make)! 
The only thing I did different is, I chose to line my shoes and turn the seams on the outside.
 I used Eco-felt which is made from recycled plastic bottles for these shoes and some cotton fabric for the lining.  I have also used 100% wool felt to make these shoes which works great too and is so cute!

Here is what I did:

1.  Print out and cut out the paper pattern and pin it to your material.
2. Cut out two soles of the felt material and the lining material.
3. Cut out two shoe shapes in the felt and two in the lining.


4. Decorate the top of the shoe now.  
I chose to embroider some leaves and sew on a flower.


I used a whip stitch around the pink flower, a back stitch for the green vines and a petal stitch for the leaf.  Then I have done some french knots in the center of the flower.


5. Before you sew the shoe together, sew each piece of lining material to the felt material on the sewing machine as shown below. 


6. Pin the shoes together and blanket stitch around all edges,
and that's it!


Here are some other variations of the bitty booty pattern I made. 


Tuesday, April 5, 2011

Homemade Laundry Detergent


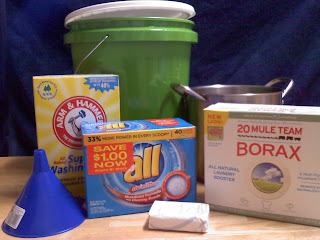
Items you will need:

- A 5 gallon bucket

- 1 Cup washing soda

- 1/2 Cup borax

- 1 bar of soap (any kind, I used Dial's Gold Bar)

- 2 Cups of your favorite powdered laundry detergent

-A cheese grater

-A one gallon stock pot

Directions:
-Fill your stock pot with approxamately 1 gallon of water and bring almost to a boil

-Grate the entire bar of soap (make sure kids and hubbies know this is soap not cheese!) set this aside
-Fill your bucket with about 3 gallons of hot tap water

-mix 1/2 cup borax and 1 cup washing soda into the bucket with hot water (disolve completely)

-once the water is almost boiling remove from heat then pour all of the grated soap into the stock pot, stir until completely dissolved.
-add the 2 cups of laundry detergent to this mixture in the stock pot, and stir this until it is dissolved as well

-Now pour all of the stock pot ingredients into the big bucket, stir to mix it all.
~~~~~~~~~~~~~~~~~~~~~~~~~~~~~~~~~~~~~~~~~~~~~~~~~~~~~~~~~
The next part is to wait. Cover your detergent with a tight fitting lid, and let it sit for about a day. I made mine at about 7:00 pm and uncovered it the next day at about 4:00pm. At this point it should be a watery gel like substance. Stir it up with a spoon, your hands or a hand held mixer (which its what I used) I then used a funnel to fill an empty bottle with the detergent.
Use about a cup full for regular washers, and about 1/3 cup full for high effenciency washers, (this is something you can experiment with, I am still in the process of figuring out my prefrences too!)

*You don't have to use the Powdered detergent. This contains an enzyme that helps prevent it from smelling if it sits a little too long in the washer.*
~~~~~~~~~~~~~~~~~~~~~~~~~~~~~~~~~~~~~~~~~~~~~~~~~~~~~~~~~
Here is the cost breakdown:
I went to Walmart, and here is what I spent,
Washing Soda- $2.77
Bar of soap- $1.32
Borax- $2.98
ALL powdered Detergent- $3.97
__________________________TOTAL $11.04
Plus I bought a funnel for .58 cents
and a five gallon bucket $3.97 with lid .96 cents

I just finished my first loads of laundry, and so far so good! I'd love to hear from you if you have a recipe that you use to make detergent!
The Simple Dollar website has a very similar process, and actually does some tests (mustard on white t shirts) with this detergent vs. Tide, check it out too if you have a chance! I'd also like to thank my friend Mati W. who walked me and some other ladies through this process!!